Add captions to Interactive Videos
Please, follow the steps below that will help you add closed captions to your interactive videos. Instructions include both Kaltura and YouTube Videos.
Add captions to Kaltura Videos
STEP 1 – On Kaltura
Once you have requested automated captioning for your Kaltura video and edited , what is automatically generated by this request, you can download the closed captions as .srt file.
- Log in to your Canvas course and click My Media in the Course Navigation.
- Click the thumbnail or title of the media you wish to access the captions.
- Choose Edit from the Actions drop-down menu.
- The Edit Media Page displays. Click the Captions tab.
- You access the media closed captions. You can select Edit Captions to review the captions and fix typos, or download them by selecting the download icon in the caption row. The caption file downloads.
- Your .srt file will be download as English.srt by default. You can rename it.


STEP 2 – Converting the .srt file into .vtt file
- Go to https://www.happyscribe.com/subtitle-tools/subtitle-converter
- Under 1. Select your subtitle file, click Select File and upload your .srt file
- Select the output format and choose WebVTT (.vtt)
- Click Convert to VTT.
- The .vtt file will be downloaded automatically.

Note: Make sure to allow pop-ups from this site. If the file download is blocked, refresh the page and repeat the steps above.
Note: Please be aware that Happy Scribe hasn’t been through a PIA. Therefore, it presents a risk for personal information or intellectual property, and it is unlikely that this tool is in line with UBC policies/guidelines.
STEP 3 – On H5P
- Log in to the Open UBC H5P Hub at: https://h5p.open.ubc.ca/
- Click the Login button located at the top right of the page.
- Click H5P Content in the left-hand menu and select Add New and under Create Content, select Interactive Video
- Review these guidelines on how to add a Kaltura Video on H5P: https://h5p.open.ubc.ca/getting-started-with-h5p/finding-your-ubc-kaltura-video-id/
- In Step 1 Upload/embed video, click Text Tracks and then Subtitles to expand the window and access options.
- Select Subtitles in the type of text track drop-down menu.
- Click Add and upload the VTT file.
- Once the VTT file is uploaded, click the Create button located at the top right of the page.

Sharing lecture recordings
If your video recordings will be shared only with students in the current term of the course, you do not need consent forms. In storing and sharing these recordings, you do need to take appropriate precautions to keep student information confidential and secure.
However, if you plan to share recordings outside the course or in a different term of the same course, either the students will need to sign content forms first or you will need to edit out the students after. Contact us at the LT Hub for more information.
Add captions to YouTube Videos
When using YouTube-hosted videos in H5P Interactive Videos, the auto-generated captions (subtitles) from YouTube will not appear in the H5P Interactive Video player. This is because YouTube doesn’t provide access to their auto-generated subtitles for external players like H5P.
A workaround is to edit and save the auto-generated captions as a new set in YouTube. Then, H5P Interactive Video player can access and display these newly generated captions from YouTube.
Here are the steps:
- Log into YouTube Studio (https://studio.youtube.com/).
- Select Subtitles from the left menu column.
- Select the name of the video for which you wish to use for the H5P interactive video content.
- For the video subtitles label including “(automatic captions),” hover your cursor over the “Published” in the Subtitles column.
- When the menu appears, click the Duplicate and Edit icon.
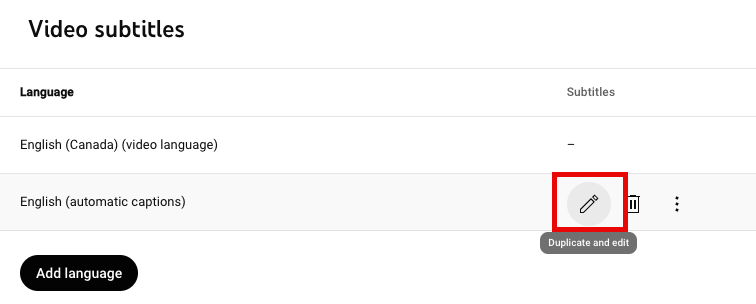
Figure 1 – The Duplicate and edit icon highlighted in the Video subtitles page
- Click Continue when it says Overwrite track. This will open the YouTube caption editor.
- Edit the auto-generated captions as needed.
- Once you are satisfied with your edits, select Publish at the top-right. Your changes will be saved as a separate file.
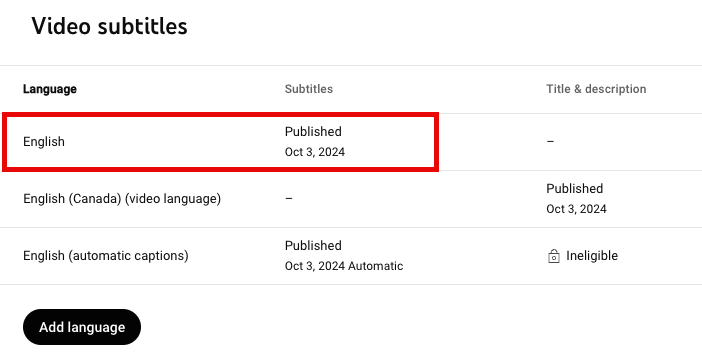
Figure 2 – The newly generated video subtitle appears at the top of the list.
Once you complete the steps above, the H5P Interactive Video player will be able to access and display the newly generated captions (subtitles) from your YouTube video.